This guide and accompanying videos and graphics will teach you almost everything you need to know about creating dielines for packaging.
Either folding cartons and corrugate boxes.
We even created sample dielines for you to download, so you can open and view first hand how it should be built.
Sound good? Let’s get started….
So You Need A Package Dieline? You must be in the process of creating a package for a product? Maybe your own product?
See how Catalpha created a custom dieline for a retail pet product. We'll walk you through the entire process from initial concepts through final printed product.
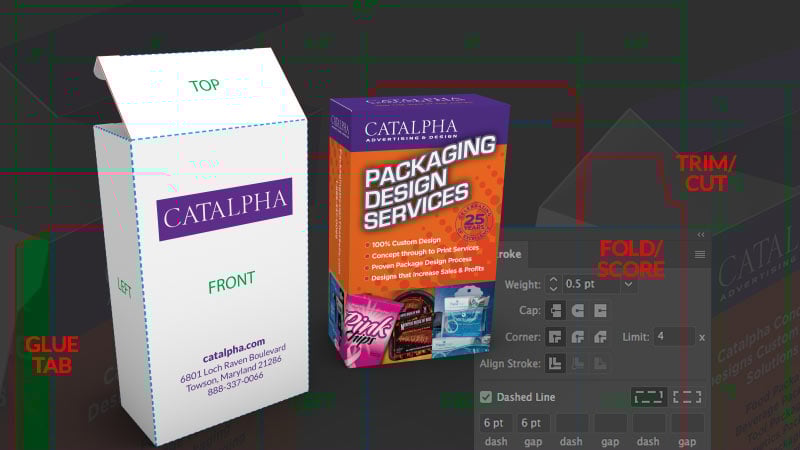
What is a package dieline? A package dieline is a vector file created as a template to determine the size, folding configuration and artwork for a printed package.
You may be trying to determine what the cost of that package could be for your product and the printing companies you've contacted don’t want anything to do with you til you have a dieline to show them exactly what you are asking for? Sound right?
Well, don’t be fooled by a quick web search for dielines.
Sites like Pinterest are chock full of posted dielines for all sorts of creatively folded gift boxes and packages.
Many geared to the crafting crowd who are looking for specialty gift box suggestions for the holidays.
Most of those dielines are only available as JPGs.
Which 'could' help to guide you, but if you want a professional dieline to apply your artwork onto that fits a specific product, here are the challenges you will need to meet.
First things first.
Let’s take a look at what needs to be packaged.
What size is it? And what size package can it fit in?
Those are only a few words, but ‘VERY BIG’ questions.
I think, as you read through this guide, you’ll understand why you need to think of the end result for your package.
Smaller boxes (or folding cartons) can use paper stocks (or lighter weight stocks). Larger boxes usually mean using a corrugate stock, and at extremely large sizes, printing / laminating or litho-labeling onto corrugate (i.e. - flat screen TV boxes)
What’s the weight of your product?
Weight, like size can affect your choice of stocks. Lighter products can use thinner stocks, heavier items, usually use heavier stocks.
How will the product be positioned within your package?
Orientation inside your package - does the product need to be oriented a certain way inside your package? Or, will your product just rest inside a closed box. This is specifically important if there will be a window, or multiple parts to your product.

Do you want me to do your packaging for you?
Yes, I want Don to do my packaging|No thanks, I'd rather do it myself
Will it be hung or sit on a shelf in-store?
Peg hooked or shelved - does it need to have a hang hole to be hung on a peg hook, or means of hanging. Sometimes having a package capable of both ways to display your product is what a store will want most.
Special Needs - are there parts that need secured inside your package -or an insert to keep your product tight and secure? Is there a need for any reinforced areas or other structural assists?
Wants - would you like an open window so a customer can touch the product or a covered window for viewing protection? any special shape, finish or material that may direct the structural design?
How will your product be packed into the printed package - Will it be automated? Packed by hand? How easy can you make the process? How long does it take to load the product into the package?
If you have a small quantity of final products to package, this won’t matter too much BUT, if you have thousands to package, your time to package will play a part in your decision making process.
How does the above affect how you break down a package into a feasible structure and how it affects your dieline development.
Typically you want to develop a package that:
- has smallest footprint you can get away with and still packages the product securely and has room for your brand message
- uses a single sheet of material where possible - using flaps, folds and die lines to achieve internal supports or holdings
- designed so that it prints ONE side - sometimes achieved by folding panels over when necessary. NOTE: Printing both sides will increase your cost significantly. So try to do everything possible to make your package print on one side.
- uses the least amount of gluing and diecutting. Dies are based on size, so a smaller die will save you money :-)
- eliminates any handwork, gluing or assembly of package. Hand work as well as gluing increase costs,
- preferably folds to ship flat. Otherwise you may be shipping air if you need to send these packages anywhere without the product.
The smallest size will use the least amount of paper saving on paper/ink/die/plate costs. Also looking further down the product chain at making savings in shipping costs and the fact that stores like the smallest footprint.
Overly large packages usually require corrugate stock for the security to the product and package, and the fact that a larger flat surface can be achieved without added internal structure. Sometimes this means constructing a box out of two or more sheets of stock.
There are times when orientation or security of product will require some additional structure other than just a plain box. This can be achieved in several ways:
- Separate inserts that hold product
- Integrated flaps and panels that fold and are diecut to hold your product
- Third party items such as zip ties, shot-throughs (Swift-Tac), wire-ties, fugitive glue etc.
A typical scenario for determining the best approach to packaging your product follows:
- Take your product and determine how it would best be presented to your buyer.
- Position it in the fashion it will be packaged
- Take exact measurements of width, height and depth with the aim of getting it a compact as possible package.
- Determine if you need any windows for viewing or touch
- Determine if you need any inside or internal supports, structure or reinforcements. Can they be integrated into one piece design or do they need to be separate.
- Determine what weight stock you can use for your package.
- Determine the best way to open and close your package - simple tuck flaps? Flaps with locking tabs? Auto-Bottom?
Keep in mind how your product will be inserted into the package - make it as easy as possible - what type of flaps, openings or lids would work best for security and ease of packing.
Be mindful of any print or printer limitations you may encounter - stock size, folding, gluing, diecutting etc…
Be aware that getting into any special or odd shape box requires even more diligence in dieline development and you must be sure it is something that can be realistically and mechanically produced through a printer—and at a cost you can afford—a cost that doesn’t end up outweighing the cost of the product it will hold.
There are many times that we have chosen one package concept over another because of cost/complexity.
Do you want me to do your packaging for you?
Yes, I want Don to do my packaging|No thanks, I'd rather do it myself
Considering Your Printer
Before getting too far into the process, make some calls and talk to printers about what they need to print your package.
They most likely will need a dieline to estimate your project, but they should be able to give you some parameters on what their capabilities are. Such as how heavy a stock they can print on and how big of a sheet of stock their presses can handle.
Some printers are not set up to print packages.
They don’t have the die cutting or gluing capabilities in house (which doesn't eliminate them, but could make their cost more expensive).
Some printers can only print on stocks up to a certain weight. Some only to 18 or 24pt.
Most should be able to print on 24pt. You’ll also find that those printing on SBS don’t print on corrugate. And visa-versa.
Sketch some thoughts thinking in 3D. As you become more proficient in thinking in 3 dimensions, your sketch process will often eliminate or narrow down feasible options for packaging your product. This stage is typically the first step for us. Another help is getting some scrap paper and physically start wrapping, cutting and folding a rough concept around your product to get a visual start on some creative, ‘out-of-the-box’ ideas that you may not have thought of for packaging your product.
Once you have determined the best package direction, it’s time to start laying it out flat.
Use the appropriate tools and software:
We use Adobe Illustrator.
(NOTE: do yourself and the printer a favor — don’t do this in Adobe Photoshop)
Deconstructing your 3D idea into flat planes that can be folded to create the package.
This can be as simple as a cube with a top, bottom and four sides, to something as complex as a hexagon, tapered or angled box. Remember to keep in mind that what you will be laying out, must be something that is realistically and mechanically able to be produced through a printer. Panels must be laid out to come together from your flat artwork in 3D to form a structured box.
You must know what weight stock you will be using to correctly layout your dieline.
This determines what tolerances you need to build into your layout for folding and fit. You can’t layout a box dieline for 18pt stock and then expect to use the same dieline for a thick corrugate stock.
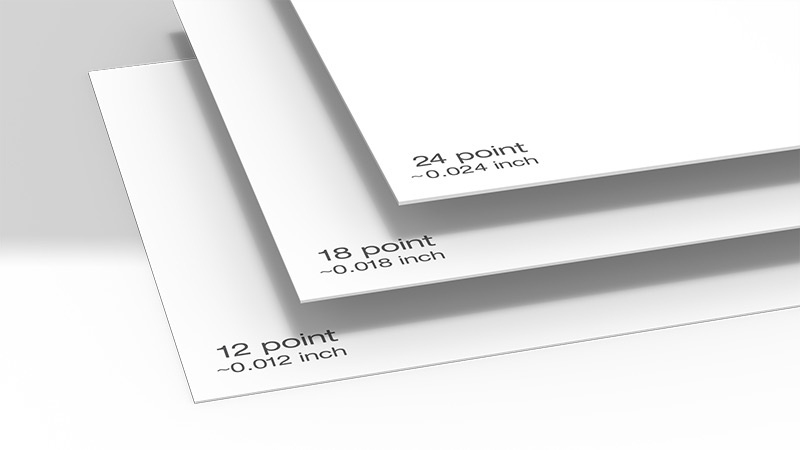
Guide To Paper Weights
Folding carton paper weights
As a guide: Business cards are usually printed on 12pt stock. Stocks get thicker the higher the number…12pt, 14pt, 16pt, 24pt. 48pt etc… They also some in C1S (coated one side) and C2S (coated 2 sides). This comes into consideration if you need to print on both sides of the sheet for your package.
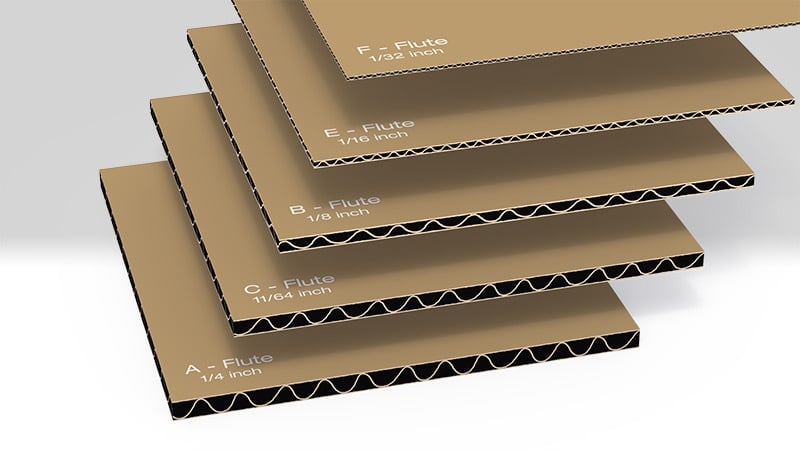
Corrugate also comes in many weights and configurations, in Singleface, single wall and double wall. See attached chart.
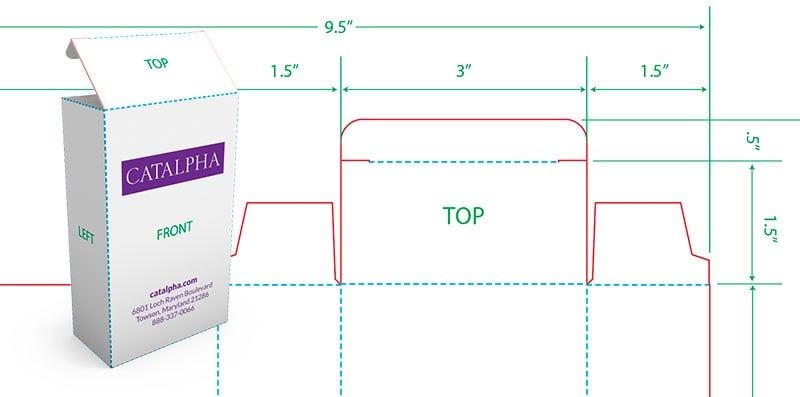
Dieline Measurements & Tolerances Are Critical
Pay close attention to fold and trim tolerances when creating your dieline. how your package folds and the order in which it will fold.
Panels that fold over one another need additional fold tolerances to allow these panels to sit flat. Angles need to be precise and folds need to be accurate and achievable.
Diecuts need to be achievable for the weight stock you are using… you can get away with finer detail on thinner paper stocks than you can using thicker card or corrugate.
Download a sample tuck flap box dieline template.
 (.zip file)
Layout
Begin by plotting your panels sizes based on your product measurements, allowing for some ‘fit’ room, and adjusting for weight of stock.
A typical dieline uses various types of line to represent different directions to your printer.
Cut lines are typically solid lines of a specific spot color. Score/fold lines are set to a different spot color and oftentimes dashed.
Any glued areas are noted. Any windows are shown on the dieline and also noted..
Any perforated lines are set to a specific color and noted. Perforations or ‘Perfs’ are at times used in place of score folds when folding against or opposite other folds.
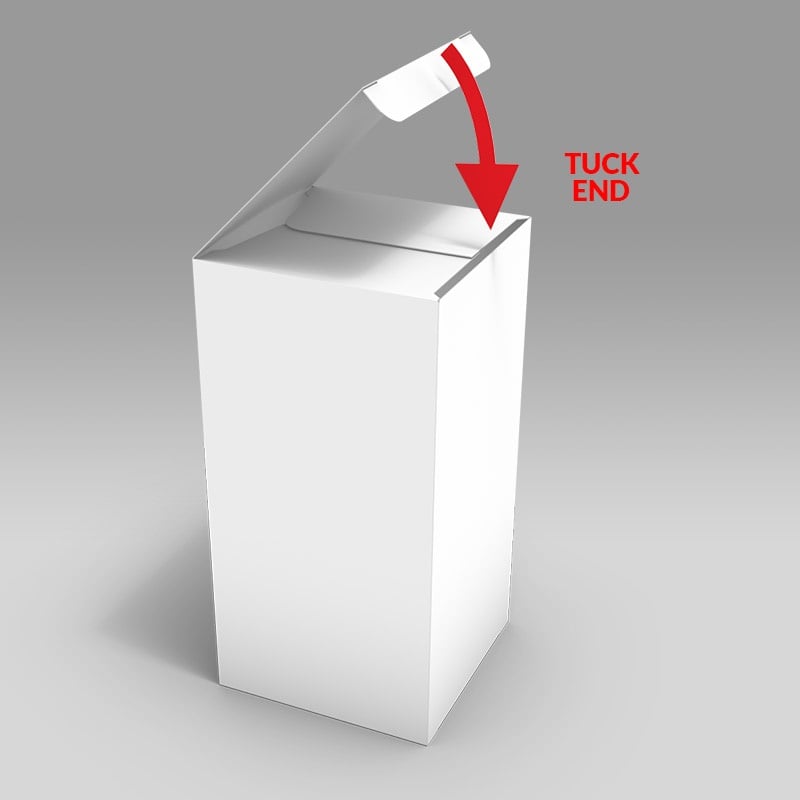
Choose an enclosure that is right for your product size and weight. See the chart below to determine that type of closure is best
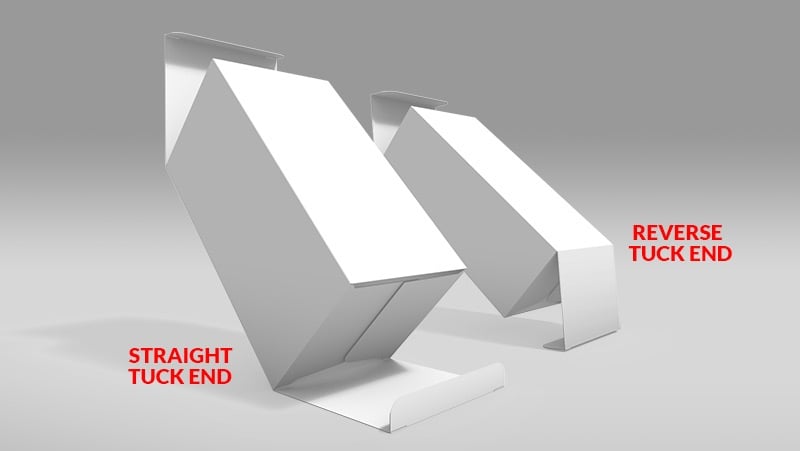
Speaking of styles. Below is a chart of some of the more common types of boxes.
 |
 |
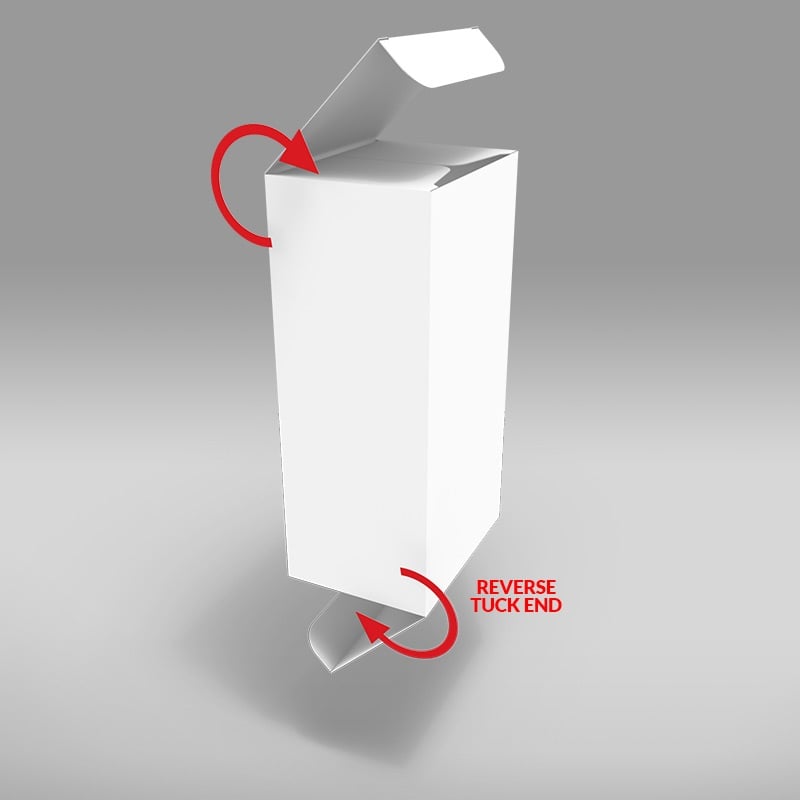 |
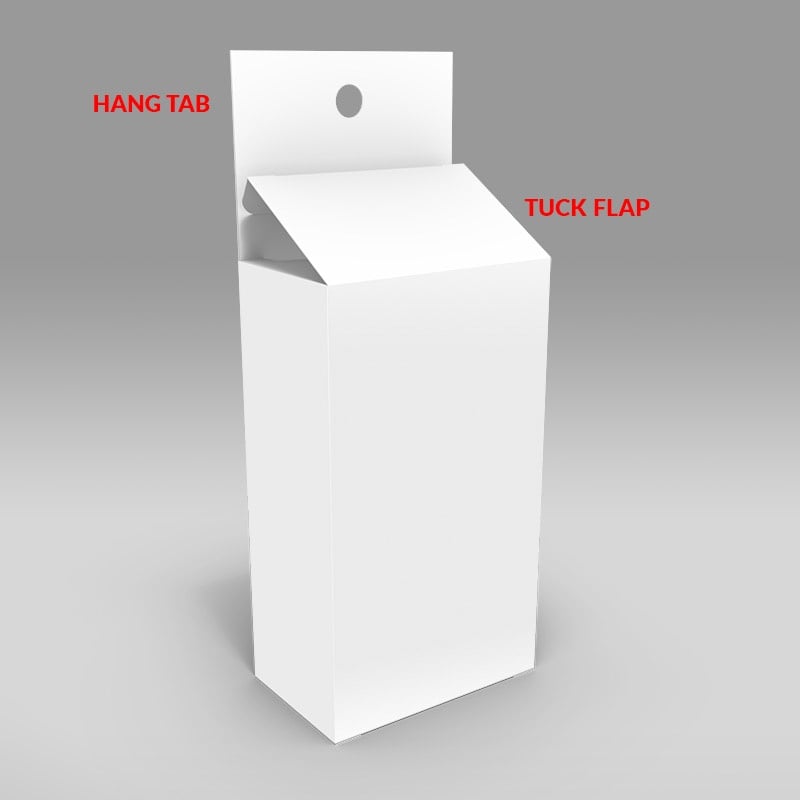
| Tuck Flap | Hang Tab (5 Panel) | Reverse Tuck Flap |
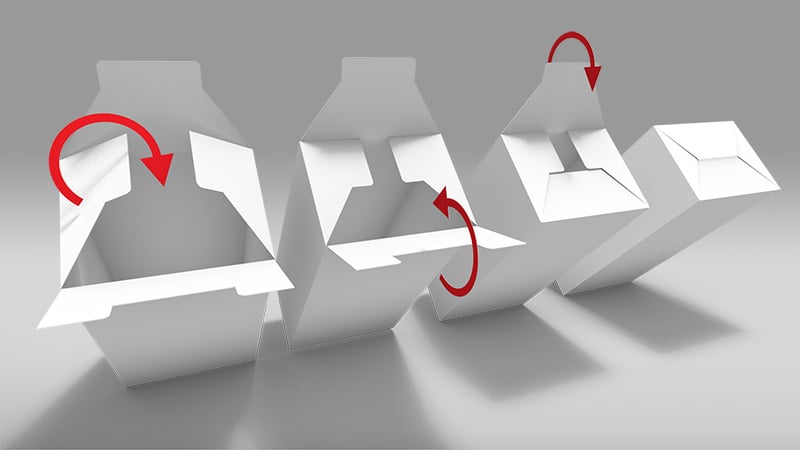 |
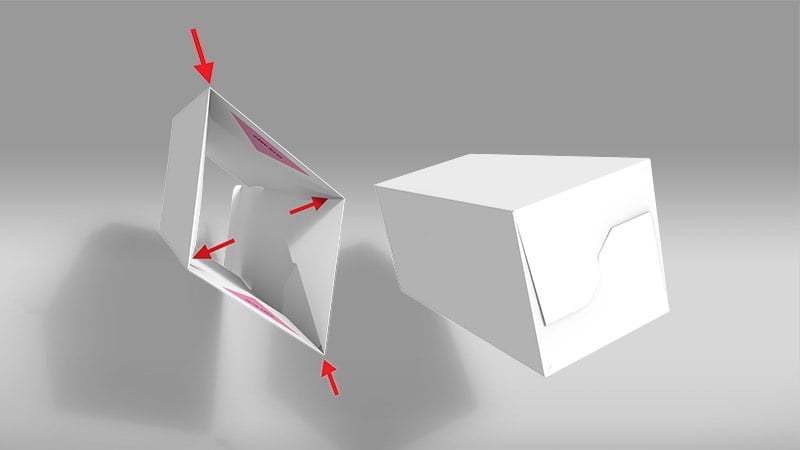 |
| Locking Bottom Process | Auto Lock Bottom |
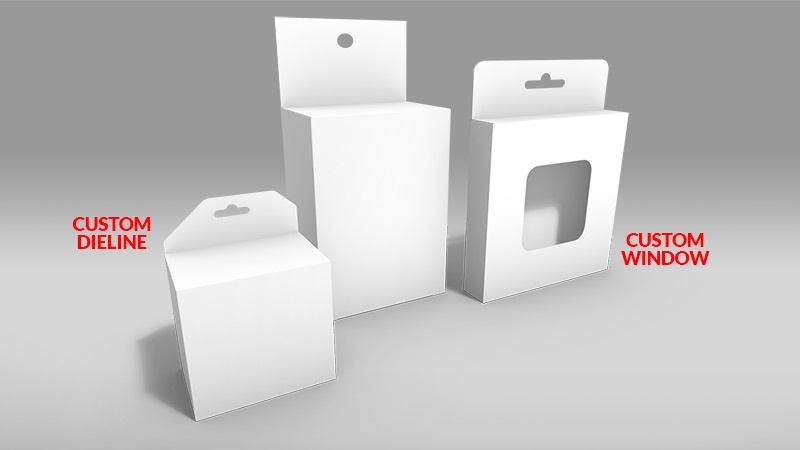 |
| A variety of hang tab packages with a custom die and a window. |
 |
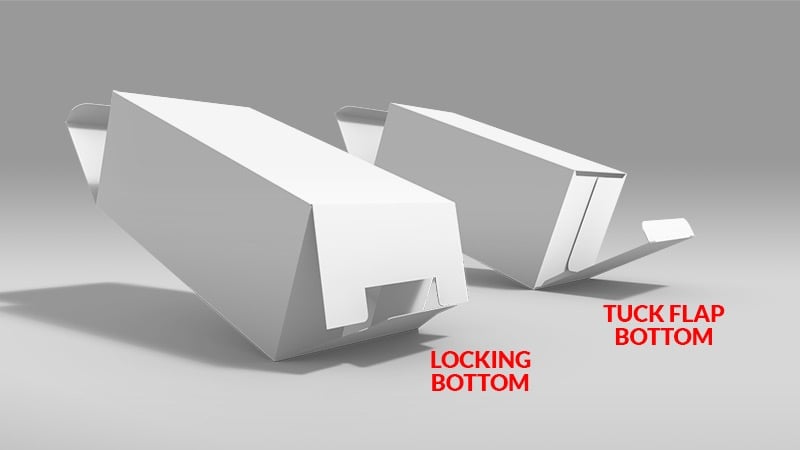 |
| Tuck flap, reverse tuck flap, tuck flap with a locking bottom, and a tuck flap bottom | |
Below is an example of a dieline at this stage for a simple tuck flap box.
Package MockUp
A critical step is making a mockup, dummy or prototype in the actual stock from your dieline and test fit your product.
This will determine if there are any errors in sizing, adjustments to fold or tolerances that need to be made.
On complex or unusual dielines this is a must, and often it drives major changes to the layout.
Maybe you realize you can save on paper size by folding a different way, that your closures need to be a different type, that it is too difficult to pack your product inside.
You then go back to your file and make any adjustment or rethink your package.
Here’s a video to show how we create a mock up from our die line.
Once you’ve achieved a viable working mock up, take the time to review and clean up your dielines. There are guides in how we set up the Illustrator file for your die line artwork.
- Make sure that dimensions are clearly noted for panel sizes and especially overall flat size of dieline.
- This allows printer to know the size sheet necessary for printing/estimating.
- Spot colors should be used for each of the different line types.
- This allows the printer to correctly separate your art from the dielines when it comes time to print.
- Sometimes in addition to a color change, the weight or type of line is used…folds are typically shown as dashed lines, etc..
- Glued areas are clearly noted.
- Windows are noted
- Stock weight is noted.
- Any special instructions are noted.
- Using the Layers in Adobe Illustrator is a help. Your dieline should be kept on different layers than your artwork for final production.
You are now ready to add your art.
Here are a few dielines you can download to help show you how these are put together. Use them to learn how to create your unique package dieline.
Now that you’ve read our dieline creating process, I suggest you watch our video on creating die lines. This shows a professional designer creating a die line for a product using the steps I just outlined above.
The benefit to creating a well thought out and drafted dieline:
- Peace of mind that you will not run into problems during production
- Printers will love you
- Clients will love you
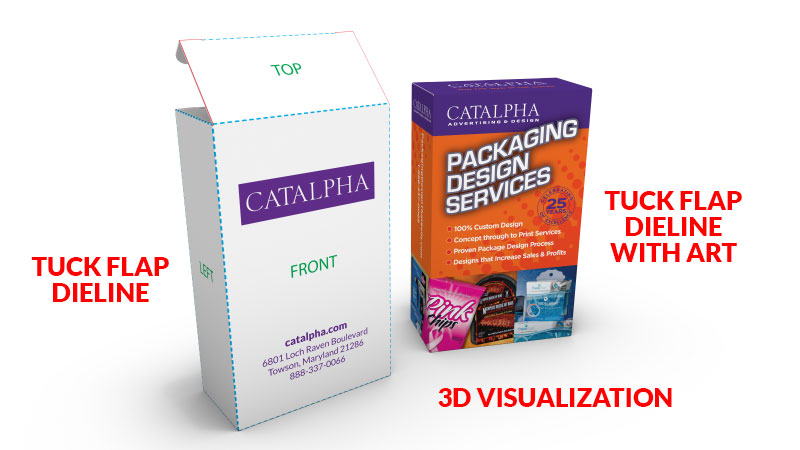
- And as a bonus, there are other programs available that can utilize your final art files to create 3D renderings straight from your file with graphics included that give you a realistic ‘in-the-round’ visual of your package prior to printing. See below example:
How about Point of Purchase dielines?
Did you know that you need a point of purchase dieline to print those great POP displays you see in many stores ?
Thank you for reading some of our best tips and strategies for creating a professional dieline.
Now I’d like hear from you:
What information from this guide helped you the most?
Are you creating a dieline for your product now?
If you still have questions on how to create a dieline, please reach out to us through the form below and we’ll do our best to answer your questions.
Here are some blog posts you might find helpful:
The Best Printing For Packaging – Pros And Cons Of 5 Printing Methods
The Definitive Guide To Product Packaging Design Process
Unique Packaging Will Make Your Product Stand Out